This article provides information on the Insured page in Appulate.
Overview
Appulate's Insured page contains information about the insured. It allows you to:
Once you have created an insured, you can visit other pages associated with them. You can also leave internal notes when creating a new insured or working with an existing one.
Creating a new insured
Depending on whether you have an ACORD filled out, you can create a new insured by clicking the buttons:
- Create new insured on the All Insured page (Insured menu);
- Create new insured from ACORD on the All Insured page (Insured menu);
- Add New on the Customers, Prospects, Former Customers, Former Prospects pages (Insured menu);
- Create new insured (Quotes menu and Policies menu);
- Create new insured from ACORD (Quotes menu and Policies menu).
Note: You can also create a new insured via Uplink.
If you click Create new insured button, it will open the Create new insured page, where you can:
- Fill in the insured information (required questions are marked with a red asterisk);
- Click Create insured.
-1.gif?width=688&height=334&name=6-26-2025%20(18-56-38)-1.gif)
Clicking Cancel will return you to your previous page. In this case, no insured will be created.
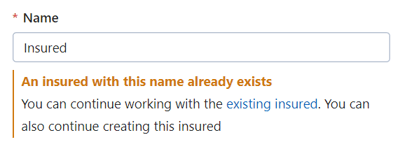
If an insured with a similar name already exists, a notification will appear. You can click existing insured to view all insured with a similar name. You can also continue creating this insured.
If you click Create new insured from ACORD button, it will open:
- File browser window for you to navigate to the desired file and select a specific ACORD you wish to upload;
- Select insurance line page, where you can select the business line that matches the line in the uploaded ACORD form and hit Continue.
After you have created an insured, you can request a new quote or add a policy on their Insured page.
Working with an existing insured
To open an insured's page, click their name on the All insured page. On the Insured page, you can:
- edit the insured;
- view their quote requests and policies and add new ones;
- manage the insured's record;
- select the insured contact (for agencies) or agency (for markets).
Editing the insured
To edit the insured's information:
- On the Insured page, click Edit in the Profile section.
- Fill in the Edit insured dialog. Some fields, for example Insured type, cannot be edited.
- Click Save to apply your changes. All changes will be synchronized with the questionnaire.
Viewing quote requests and policies
The Quotes and policies section displays all of the insured's quote requests and policies:
- To open a quote request or a policy, click its card. You will be redirected to the Quote request page or Policy page.
- To view expired or canceled quote requests or policies, click Expired and canceled.
You can add a policy or request a new quote by clicking the buttons to the right:
![]()
Clicking Add policy will open the Add policy page, while clicking Request new quote will redirect you to the Create new request page.
Managing the insured's record

To manage the insured's record, click ![]() on the Insured page. This will open a list with the following options:
on the Insured page. This will open a list with the following options:
-
Copy insured. Clicking this button will redirect you to the insured's copy.
- Export insured. Clicking this button opens the Export page for exporting this insured's data from Appulate to an agency management system. This button will only appear if your company has the export functionality configured in Setup > Settings > Agency Management System.
-
Merge insured. This button won't appear if the insured has quote requests. Clicking it starts the merging procedure.
-
Delete insured. This button's visibility depends on the Who can delete an insured setting. Clicking the button opens the Delete insured confirmation dialog.
Insured contact and Agency
In the top-right corner, the Insured page displays the:
-
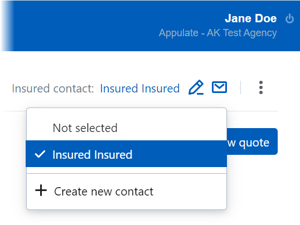
Insured contact for agency users

You can edit the insured contact by clicking ![]() , as well as email them
, as well as email them ![]() .
.
You can also select another contact or create a new one. Just click the current contact (or Add insured contact if the contact is missing) and select an option from the list.
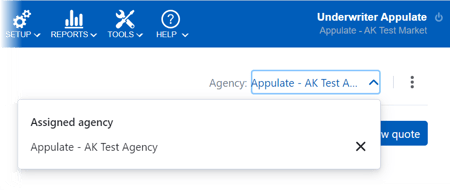
- Agency for market users

If you want to assign another agency to this insured, click ![]() to unassign the current one and select a new option in the Assigned agency field.
to unassign the current one and select a new option in the Assigned agency field.
If no agency has been assigned, click Select and select an option in the Assigned agency field.
Note: The Agency: Select section will be hidden if there are no quote requests or policies.
Insured pages navigation

In addition to the main Insured page, the insured have a number of associated pages:
- Certificates: Certificates of insurance for this insured's policies.
- Contacts: Contact information of the insured or their representatives.
- Insured documents: Uploaded documents associated with the insured.
- Admin: Internal admin information on an insured customer.
- Activity log: All events relating to this insured, their quote requests and policies.
To switch between the Insured and Certificates tabs, just click their names. To open the other pages, click the menu ![]() and select a page from the list.
and select a page from the list.
Insured documents
You can upload and manage insured-related documents on the Insured documents page.
This page is largely similar to the Documents page for quote requests and policies. However, documents uploaded on the Insured documents page don't automatically get uploaded to the Documents pages for this insured's quote requests and policies.
The documents are divided into sections:
- Forms (ACORDs and Supplementals);
- Loss Runs (except LossRunner, as this functionality is only available on the Loss Runs page);
- Quotes (except for quotes uploaded on the Quote request page);
- Policies (except for policy documents added on the Documents page for quote requests and policies or the Policy page);
- Other Documents (Other, ExMod Sheet, Notice of Cancellation, Declaration Page, Resume/Bio, SL-2, Statement of Values, D-1 );
- Emails (emails you upload to Appulate).
You can upload documents by clicking Upload files (Choose files if the page is empty) or dragging and dropping them onto the page.
This will open the Document markup editor. There, you can provide information about this document: choose its Type, edit its File Name, and add Notes.
To edit the document, click ![]() (Edit). This will open the Document Markup editor.
(Edit). This will open the Document Markup editor.
Each document also has a menu ![]() with the following actions:
with the following actions:
- Send by email. Opens the Send Email window, from where you can email the document to specified recipients.
-
Move. Opens the Move document dialog, using which you can move the document to another insured, quote request, or policy.
- Delete. Deletes the document after you confirm it in a dialog.


